
When developing on a remote computer over SSH from iOS, one problem has vexed me: how to get content from the remote machine’s clipboard into the iOS clipboard.
For fun, I decided to see how far I could get toward solving this problem using only command-line tools – that is, without writing any code.
This post details options available for remote machines running Linux with an active X Windows session, Linux machines without X Windows, and macOS machines.
If you’re reading this, you might also like my summary of the state of coding on the iPad Pro in 2019.
How Should It Work?
You can already select text with your finger in an SSH app and copy to the iOS system clipboard, as long as the text you want to copy is visible on the screen. But how do you copy large amounts of text from inside a text editor like Vim, copy command output via pipes, or copy from the scrollback buffer within a tmux session?
In all of these cases – not only when using your finger – you should be able to copy text on the remote server and then paste it into any iOS app. That’s the dream.
Tip: If you want to follow along with this post and do not already have a Linux VM running somewhere, I recommend Digital Ocean if you want something quick to get started.
When the Remote Machine is Running Linux
If the remote computer’s operating system is Linux, the typical approach on a client computer running macOS, Windows, or Linux is to run an X server locally and SSH to the remote machine with X forwarding turned on. You can then either run a graphical terminal like gnome-terminal over X, or use xsel from the command-line (e.g., cat file.txt | xsel --clipboard) to copy to the clipboard, letting the X server synchronize the clipboard.
However, no iOS app that I’m aware of supports X forwarding over SSH. An X Server app exists, but it didn’t even support pasting from the iOS system clipboard when I tested it, let alone synchronizing the X clipboard and the iOS system clipboard.
So, X forwarding is out. However, we’d still like to access the remote clipboard. How far can we get using just command-line tools and an SSH app on iOS like Blink Shell?
With a Running X Windows Session
If you’re connecting to a Linux machine that has a running X Windows session, perhaps your primary desktop machine, you can log in via SSH and set the DISPLAY environment variable – either via your .bashrc/.zshrc file or manually – to use the existing session’s X clipboard.
You would set DISPLAY like this:
export DISPLAY=:0
If you don’t know which display your X session is using and :0 doesn’t work, run w -oush to see the list of login shells. At least one of these will be a tty with a display value like :0.
TIP: You can automate setting DISPLAY in your shell profile, or with an alias, using a command like the following, which gets the first display value:
export DISPLAY=`w -hs | awk '{print $3}' | sort -u | grep : | head -n 1`
After exporting DISPLAY, you can use xsel --clipboard to copy and paste from command-line applications like Vim and tmux into the X clipboard. There are many tutorials that explain how to do this, so if you haven’t set this up yet, do some web searching and come back when it works. However, I assume that if you are running X Windows, you have probably already set up your command-line tools to copy to the X clipboard.
Now, the question is: how do we get the X clipboard contents into the iOS system clipboard?
Getting the Clipboard Contents Using Blink Shell (With X Windows)
Blink is an SSH app for iOS that, in addition to having a nice command-line interface to SSH and Mosh (the “mobile shell”), also has a local interactive shell with access to a small number of command-line utilities that run directly on iOS.
While I recommend Blink for its SSH features, you can use its local shell to manipulate the iOS system clipboard with pbcopy.
pbcopy is similar to xsel --clipboard in that it accepts input via pipes, like echo test | pbcopy, and copies that intput to the system clipboard (in this case, iOS’s).
So the simplest thing you can do if you are connecting to a remote computer that has a running X Windows session is the following:
- Connect to the remote machine in one Blink terminal and set the
DISPLAYenvironment variable - Copy text into the X clipboard via tmux, Vim, or other command-line tools at your leisure, using
xselorxclip - Keep a second Blink terminal open, but disconnected, to use the local Blink shell. Whenever you need to synchronize the remote clipboard to the iOS clipboard, run a command like
ssh <host> "DISPLAY=:0 xsel --clipboard" | pbcopy, which will connect to the remote machine, output the clipboard, and then pipe that output to the iOS system clipboard.
Getting the Clipboard Contents Using the Shortcuts App (With X Windows)
If you don’t want to spend money on Blink, you can also use the free Shortcuts app from Apple to create a shortcut that connects to the remote machine, outputs the X clipboard, and then copies that output to the iOS system clipboard.
To do so, follow these steps:
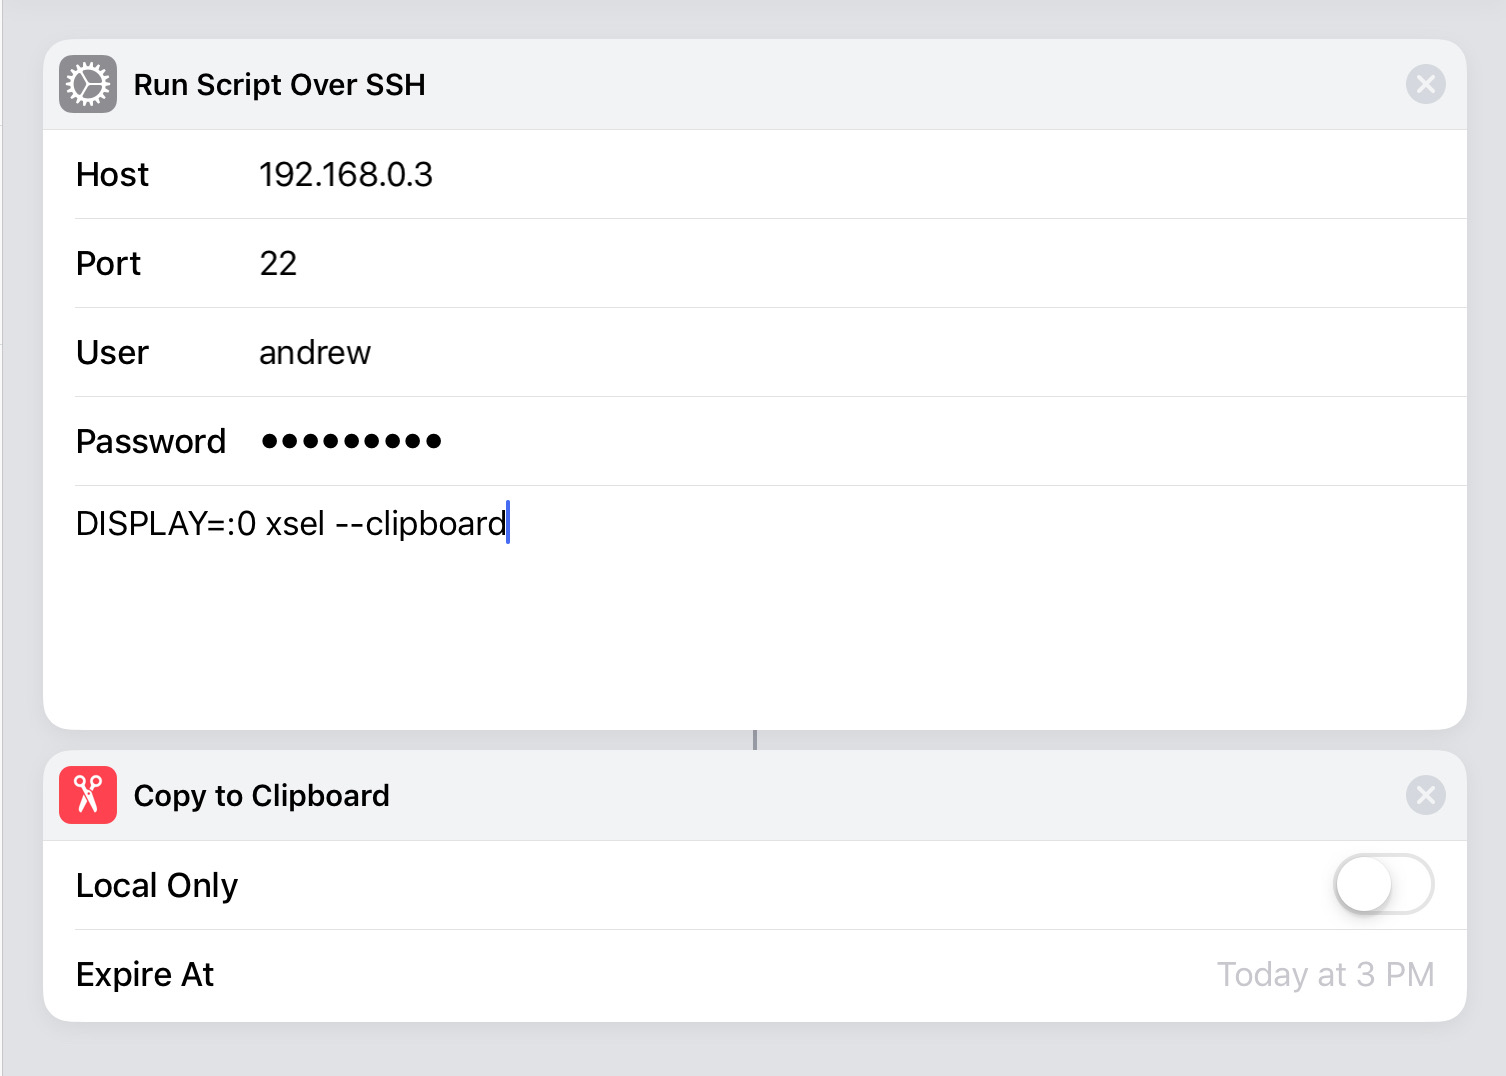
- Create a new Shortcut and add the “Run Script over SSH” step
- Fill out authentication details (“Run Script over SSH” only supports user/password authentication, not SSH keys)
- Set the command to something like
DISPLAY=:0 xsel --clipboard(or use a script to get the display value automatically, as discussed earlier)
If you are the sort of person who would enjoy speaking the words “Hey Siri, clipboard” to execute this shortcut, then you can also give it a “Siri Phrase.”
Once created, your Shortcut will appear in Spotlight results, so you can press Command+Space to open Spotlight, type part of your Shortcut name, and then press Enter to run it.
However, an unfortunate reality of Shortcuts is that there is no way to complete their execution without tapping the screen. Bummer, dude.
Without a Running X Windows Session
Of course, not everyone is running a full Linux desktop with an X Windows session. Many of us use a headless VM for remote development. How can we access the system clipboard in that environment?
clip.txt
The last question was sort of a trick. When developing on a headless Linux server over SSH, there is no “system clipboard.” The closest thing is the X clipboard, which won’t be running without a display.
If we want to copy text within Linux programs like Vim and tmux in a headless environment and somehow expose that text to the iOS clipboard, then we need to build our own lightweight clipboard. Let’s call it clip.txt.
Storing Multiple Items in the Clipboard
The “clipboard” concept is a single-item buffer in some operating systems, while on others it can store multiple items. Because a multiple-item clipboard is a little more fun, that is what we will create.
We will create this multi-item clipboard in a file called clip.txt. To support storing multiple items, let’s use a “log” structure: we’ll append new items to the end, and read the last item to determine the current clipboard content.
In order to distinguish multi-line clipboard items from each other and from single-line items, we will use a unicode symbol as an entry delimiter. The symbol will be White Chess Queen Emoji, ♕ (code point U+2655).
We could start getting very fancy indeed with these entries, by for example storing them in a structured format and trying to figure out how to replicate them. However, let’s pull back from that abyss for the moment.
Writing to the Clipboard with the “clip” Script
Now that we know we’ll store our clipboard contents in the file clip.txt, we need a way to append items to that file. We could just echo or cat text to the end of the file, like echo pants >> ~/clip.txt. However, we want to add our White Queen delimiter, so let’s create a clip script that will serve as the command-line interface for copying things to clip.txt.
Here is an example clip script:
#!/bin/zsh
CLIPBOARD=${CLIPBOARD:=~/Dropbox/clip.txt} # 1
echo \\n♕\\n >> $CLIPBOARD                 # 2
cat - >> $CLIPBOARD                        # 3
echo \\n >> $CLIPBOARD                     # 4
It’s only four lines, but there are a few arcane invocations at work:
- Use the
CLIPBOARDenvironment variable if set; otherwise use a default value. - Append White Chess Queen to the end of the clipboard file.
- Append standard input (piped content) to the clipboard file.
- Make tac happy by ensuring the entry ends with a newline.
As you can see, I’m going to throw caution to the wind and store my clip.txt in Dropbox. You are free to augment clip and lastclip with some command-line encryption and decryption steps.
Does our clip script work? Let’s try it out.
$ echo test | clip
$ echo "hello\nthere\nmatey" | clip
$ cat ~/Dropbox/clip.txt
♕
test
♕
hello
there
matey
Looks like it works!
TIP: I placed my clip script in ~/bin, which is on my zsh path.
Reading from the Clipboard with the “lastclip” Script
Now that we can write items to the clipboard, let’s write a script to read the last item.
#!/bin/zsh
CLIPBOARD=${CLIPBOARD:=~/Dropbox/clip.txt}       #1
cat $CLIPBOARD | tac | sed '/♕/Q' | tac          #2
- Again, we provide a default for the
CLIPBOARDenvironment variable. - We use
tacto reverse the contents of the clipboard file so that we scan it from end to beginning, print everything until the first White Queen withsed, and then runtacagain on the matching item so that if it has multiple lines they are sorted correctly again.
Let’s test it out!
    $ lastclip
    hello
    there
    matey
It worked! Okay, now we need to get this output into the iOS system clipboard.
TIP: I saved this script as ~/bin/lastclip, again because ~/bin/ is on my path.
Getting the Clipboard Contents Using Blink Shell (Without X Windows)
As with the section on using a running X Windows session, we will use the local shell provided by the Blink app to access the ssh and pbcopy commands.
Using these, we can pipe the last clipboard item from the Linux server into the iOS system clipboard.
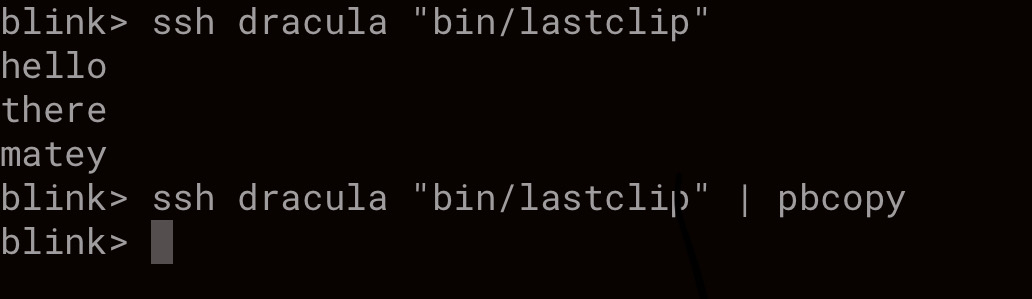
In the following screenshot, I use Blink to execute the lastclip command on the remote server (I’ve named my server “dracula” because I like monsters, not because I view this entire exercise as a waste of time and money) and pipe its contents to pbcopy on iOS.
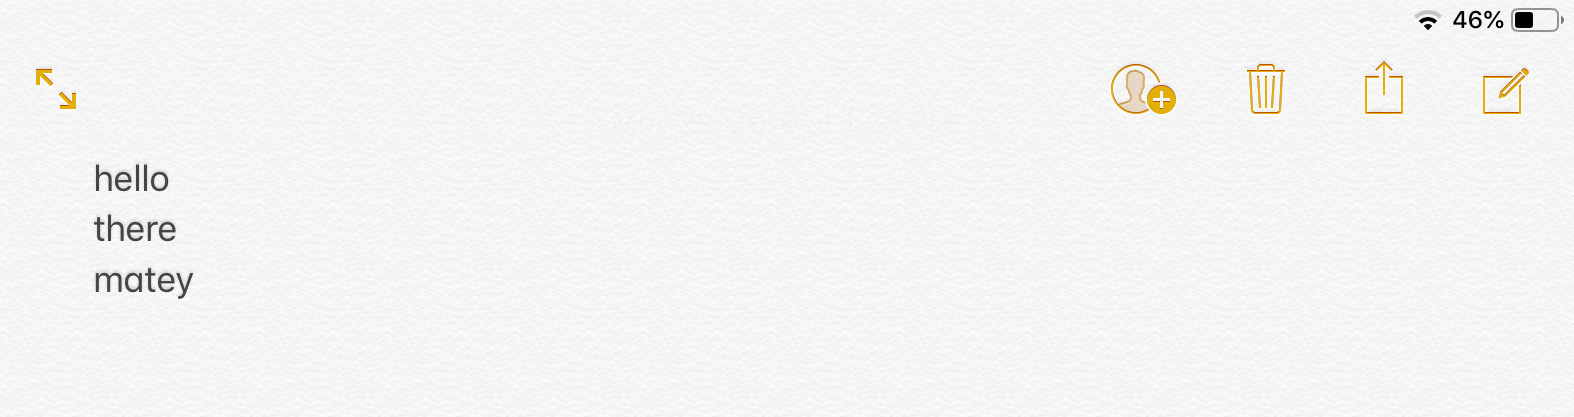
Then, as shown in the next screenshot, I can switch to Apple Notes and use the Command-V keyboard shortcut to paste from the iOS system clipboard. Thanks to pbcopy, the content of the clipboard is the last item stored in the clipboard (well, clip.txt) on the remote server, which gets pasted into Notes.
Success! It just took a couple of shell scripts, a $20 SSH app, and manual intervention to run the command! What it lacks in convenience it makes up in satisfaction, right?
Getting the Clipboard Contents Using the Shortcuts App (Without X Windows)
As in the initial Shortcuts example, you can use the Shortcuts app to create a shortcut to perform roughly the same action.
The only difference is that the SSH command to run is lastclip.
And as mentioned before, if you would like to be a wizard you can give it a magical “Siri Phrase” like “exemplum.”
Interlude: Removing the Manual Step
Having to manually run a Shortcut or ssh command to copy the clipboard to iOS is weak.
Wouldn’t it be great if you could store the clipboard in Dropbox, watch for changes in that file from iOS, and then run either the Blink command or Shortcut when the file changed?
Well, you can’t.
Or, what if the clip script could publish events to a remote system that iOS devices could subscribe to, and then react by running an SSH command or Shortcut? Without, that is, having to write any code? Maybe using IFTTT or Zapier?
Nope, you can’t – not that I could figure out, anyway.
So, if you enjoy wasting time on these sorts of pursuits, I encourage you to research the problem and report back.
Interlude: How to Use the “clip” Script with Vim and tmux
So far, we have done some interesting things to enable piping text to a clipboard-like file on a Linux server. But our examples have all involved using echo or cat. How do we get command-line tools like Vim and tmux to use our new clip and lastclip commands?
With Neovim (but not Vim), you can set a custom clipboard provider. So you would add the following code to your .vimrc:
let g:clipboard = {
      \   'name': 'myClipboard',
      \   'copy': {
      \      '+': 'clip',
      \      '*': 'clip',
      \    },
      \   'paste': {
      \      '+': 'lastclip',
      \      '*': 'lastclip',
      \   },
      \   'cache_enabled': 1,
      \ }
set clipboard+=unnamedplus
Now any yank operation you perform in Neovim will send the selected text to clip, while pasting will read the last item with lastclip. Cool!
tmux can also use a custom command for copy operations. I use Vi keys with tmux, so my configuration looks like this:
bind-key -T copy-mode-vi y send-keys -X copy-pipe-and-cancel "clip"
bind-key -T copy-mode-vi Enter send-keys -X copy-pipe-and-cancel "clip"
When the Machine is Running macOS
Having covered possibilities for getting the contents of a “clipboard” from a remote Linux machine into the local iOS clipboard over SSH, let us examine the options for doing so if the remote machine is instead running macOS.
The Tragedy of pbcopy
Most people who use command-line tools like Vim and tmux on macOS have wired up those tools to copy and paste from the macOS system clipboard using pbcopy, which you may recognize from our past examples, in which we used pbcopy to pipe text into the iOS system clipboard from within the local shell provided by Blink.
pbcopy on macOS works the same way: one pipes content to it, and that content is copied into the system clipboard.
You might think that the “Universal Clipboard” feature of iOS and macOS would work with pbcopy, so that after piping text to pbcopy on macOS, you could paste that text on iOS. However, that is not the case! pbcopy doesn’t sync with other devices over Universal Clipboard, so if you copy a line in Vim or tmux, that text won’t be in the clipboard of your iPad.
It won’t, that is, unless you trigger the same manual copy step that other sections of this post detail.
Getting the Clipboard Contents Using Blink Shell (macOS Remote)
As with the section on using a running X Windows session, we will use the local shell provided by the Blink app to access the ssh and pbcopy commands.
This time, because the remote machine is running macOS, we will pipe the output of pbpaste from the remote machine as input to pbcopy in the local shell provided by Blink.
The process is as follows:
- Connect to the remote machine in one Blink terminal
- Copy text into the macOS clipboard via tmux, Vim, or other command-line tools at your leisure, using
pbcopy - Keep a second Blink terminal open, but disconnected, to use the local Blink shell. Whenever you need to synchronize the remote clipboard to the iOS clipboard, run a command like
ssh <host> pbpaste | pbcopy, which will connect to the remote machine, output the clipboard, and then pipe that output to the iOS system clipboard.
Getting the Clipboard Contents Using the Shortcuts App (macOS Remote)
As in the initial Shortcuts example, you can use the Shortcuts app to create a shortcut to perform roughly the same action.
The only difference is that the SSH command to run is pbpaste.
And as mentioned before, if you would like to be a wizard you can give it a magical “Siri Phrase” like “exemplum.”
But What do I Really Think About All This?
About 50% of the comments that people leave about posts related to writing code on iPads is something like the following:
This is stupid. Only masochists would do this. Get a real computer.
– Sincerely, a realist
To which I can only reply: absolutely spot on! Everything about trying to use iOS as a productive operating system for software development is maddening. If you really need a touch-enabled operating system with a tablet form factor and robust support for software development, get a Surface device. iPads are great for reading, writing, drawing, watching TV, and playing games – but not writing code.
However, there is something about the iPad that excites the imagination of people like me. Wouldn’t you like to carry around a device almost as thin and light as paper on which you could write code? I think that would be cool! Maybe 2019 will be our year.


